
Introduction
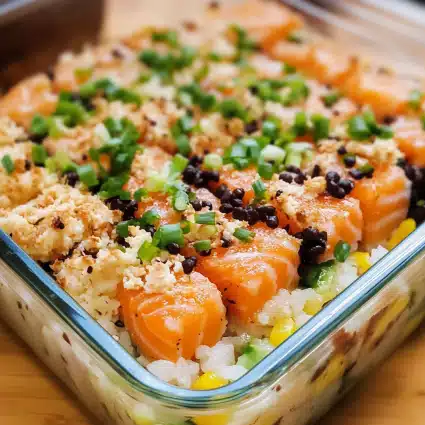
If you’re a sushi lover, then you’re going to absolutely fall for this Salmon Sushi Bake. It’s a warm, baked version of sushi—without the need for rolling or worrying about perfecting your sushi rice. Imagine the fresh, creamy, melt-in-your-mouth taste of sushi, but served in a cozy, casserole-style dish. Yes, please!
I stumbled upon this recipe during a lazy weekend when I craved sushi, but rolling it just seemed like too much work. I was looking for something simpler and more hands-off—yet still had that sushi magic. And that’s when I found the idea of a sushi bake. It’s perfect for when you want the sushi experience but without the hassle. A few quick steps, a little layering, and before you know it, you have a baked dish full of flavor, texture, and all the comforts of sushi in one bite.
This recipe has become a household favorite. It’s creamy, savory, and just a little crispy around the edges. Plus, it’s super customizable depending on what you like. Whether you’re feeding your family on a busy weeknight or serving it up for a fun weekend gathering, this salmon sushi bake is guaranteed to be a hit. And don’t worry if you’re new to making sushi-inspired dishes—this is an easy one to tackle, and I promise it’ll be just as satisfying as your favorite sushi roll. Let’s dive in!
Why You’ll Love This Recipe
There are so many reasons to love this Salmon Sushi Bake, and here are just a few:
- No sushi rolling required: If you’ve ever tried to make sushi rolls at home, you know it can be a little intimidating. This bake gives you all the deliciousness of sushi without any of the stress. It’s a simple, baked version that anyone can make—even if you’ve never rolled sushi in your life!
- Flavor-packed: With layers of creamy mayo, savory soy sauce, and tender salmon, every bite is an explosion of flavor. The top gets beautifully golden and crispy, adding a satisfying crunch that contrasts perfectly with the creamy, melt-in-your-mouth filling.
- Great for sharing: This dish is perfect for family meals, potlucks, or casual get-togethers. It’s served in a casserole dish, so it’s easy to portion out, and it has that “everyone gather around and dig in” vibe. You’ll love watching your friends and family enjoy it together.
- Totally customizable: Want to switch up the flavors? You can! Add a little spice with sriracha mayo, throw in some avocado for creaminess, or even make it spicy and tangy with pickled ginger. The possibilities are endless!
Trust me, once you make this Salmon Sushi Bake, it’ll be one of your go-to dishes for any occasion.
Preparation Time and Servings
- Total Time: 40 minutes
- Prep Time: 20 minutes
- Cook Time: 20 minutes
- Servings: Serves 4-6 people
- Nutrition Facts (per serving):
Calories: 350
Protein: 20g
Carbs: 30g
Fat: 20g
Ingredients
To make this Salmon Sushi Bake, you’ll need a few key ingredients:
- 2 cups sushi rice: Sushi rice is sticky and just the right texture for this recipe. It’s the perfect base to hold all the delicious layers.
- 2 tbsp rice vinegar: This adds the tangy sushi rice flavor that we all know and love.
- 1 lb fresh salmon fillet: Use fresh, skinless salmon for this recipe. You’ll be flaking it into the bake, so make sure it’s fresh for the best flavor.
- 1/2 cup mayonnaise: This gives the bake that creamy, rich texture that makes it so irresistible. You can use regular or Japanese mayo for extra flavor.
- 2 tbsp soy sauce: A must for that salty, umami-rich flavor. You can substitute with tamari for a gluten-free option.
- 1 tbsp sriracha (optional): If you like a little heat, sriracha is the perfect addition. Add more if you love spice!
- 1/4 cup green onions: These will add a fresh, oniony crunch and color to your dish.
- 1/4 cup furikake: A Japanese seasoning mix with toasted sesame seeds, seaweed, and other goodies. It adds that authentic sushi flavor!
- 1 tbsp sesame seeds: For a little extra crunch and visual appeal.
- 1 sheet nori (seaweed): To serve on the side, so you can scoop the bake with pieces of nori or sprinkle it on top for extra texture.
Step-by-Step Instructions
- Cook the sushi rice: Start by cooking the sushi rice according to package instructions. Once it’s done, let it cool slightly. Then, mix in the rice vinegar, and a pinch of salt. This is the foundation of your sushi bake, and it’s essential to make sure the rice is seasoned just right.
- Prepare the salmon: While the rice is cooling, take the fresh salmon fillet and cook it. You can either bake, pan-sear, or even grill it until it’s fully cooked through. I like to keep things simple and bake the salmon at 375°F (190°C) for about 12-15 minutes, or until it flakes easily with a fork. Once cooked, flake the salmon into bite-sized pieces.
- Make the creamy sauce: In a small bowl, mix together the mayonnaise, soy sauce, and sriracha (if using). This will create the creamy sauce that gets mixed with the salmon to form that rich, flavorful layer in your sushi bake.
- Assemble the sushi bake: Preheat your oven to 375°F (190°C). In a baking dish (about 9×9 inches), spread the sushi rice evenly to form the bottom layer. Press it down gently so it sticks together. Then, evenly distribute the flaked salmon on top of the rice.
- Top with creamy mixture: Spoon the mayo and soy sauce mixture over the salmon, spreading it evenly. Don’t be shy with the sauce—it adds so much flavor and makes the dish extra creamy.
- Bake the sushi bake: Place the baking dish in the preheated oven and bake for 15-20 minutes, or until the top is golden brown and slightly crispy. The rice on the bottom will get a little crunchy, which adds a delightful texture to the dish.
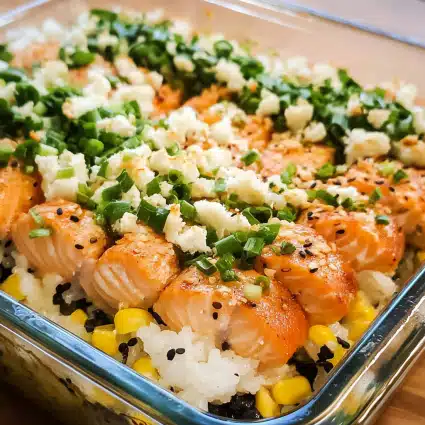
- Finish with toppings: Once your sushi bake is out of the oven, sprinkle it with green onions, furikake, and sesame seeds. This adds flavor, texture, and a pop of color. If you’d like, you can serve the sushi bake with pieces of nori on the side, which adds a fun element and helps you scoop up all that creamy goodness.
How to Serve
- Serve with Nori Sheets: Break the nori sheets into smaller pieces and use them to scoop up the baked sushi layers. It’s the perfect sushi experience without needing to roll anything!
- On Its Own: If you want to keep things simple, serve the sushi bake just as it is. You can scoop it directly from the baking dish and enjoy it hot and bubbly.
- With a Side Salad: Pair it with a light side salad, like a simple cucumber salad with rice vinegar, to balance the richness of the bake.
- With Pickled Ginger: Serve with some pickled ginger on the side to add a tangy contrast to the creamy dish.
Additional Tips
- Perfect Rice: Sushi rice is key to making this dish taste authentic. If you have the time, rinse the rice a few times before cooking it to remove excess starch. This helps the rice get that perfect sticky texture that holds together when you eat it.
- Don’t Overcook the Salmon: Salmon is best when it’s slightly undercooked in the center (it will finish cooking in the oven). If you overcook it, the salmon might turn dry, so make sure to keep an eye on it while baking or pan-searing.
- Use Full-Fat Mayo: For the creamiest, most flavorful topping, I recommend using full-fat mayonnaise, preferably Japanese mayo (like Kewpie), which has a smoother, richer taste than regular mayo.
- Customize the Heat Level: If you love spicy food, you can adjust the amount of sriracha in the sauce to suit your taste. You can also drizzle some extra spicy mayo on top after baking for that added kick.
- Leftovers: This dish makes great leftovers. Just store it in the fridge in an airtight container for up to 2-3 days. Reheat it in the oven or microwave for a quick meal.
Recipe Variations
- Swap the Salmon: Don’t have salmon on hand? You can easily swap it for cooked shrimp, crab meat (real or imitation), or even tuna. If you prefer a plant-based option, use marinated tofu or mushrooms for that savory, umami flavor.
- Make it Spicy: Want more heat? Add a little extra sriracha to the mayo mix or drizzle a spicy sauce over the top after baking. You can also add chopped jalapeños for some fresh, spicy crunch.
- Vegetarian Option: Skip the seafood entirely and opt for a vegetarian sushi bake. Try a mixture of avocado, cucumber, and pickled vegetables like carrots and radishes, or a mix of roasted vegetables like sweet potato, mushrooms, and zucchini.
- Gluten-Free: Make this recipe gluten-free by using tamari in place of soy sauce and ensuring that your furikake mix is gluten-free. You can also use gluten-free breadcrumbs as a topping for extra crunch.
Serving Suggestions
- Side Dishes: This sushi bake pairs wonderfully with a simple cucumber salad, seaweed salad, or even some miso soup. You want something light to complement the richness of the bake.
- Drinks: If you’re serving this for a casual gathering, pair it with some iced green tea or a refreshing lemon cucumber drink. If you prefer alcohol, a chilled bottle of sake or a crisp white wine like Sauvignon Blanc would complement the flavors beautifully.
- For Kids: Serve the sushi bake with a side of steamed broccoli or some crispy tempura vegetables for a kid-friendly sushi-inspired dinner.
Freezing and Storage
- Storage: Leftovers of this sushi bake can be stored in an airtight container in the fridge for up to 2-3 days. When reheating, cover it with foil and bake at 350°F for about 10-15 minutes to warm it up without drying out the top.
- Freezing: You can freeze this dish, though the texture might change slightly after freezing. To freeze, let the sushi bake cool completely before wrapping it tightly in plastic wrap and aluminum foil. Freeze for up to 2-3 months. When ready to enjoy, thaw it overnight in the fridge and reheat in the oven at 350°F until warm throughout.
Special Equipment
- Baking Dish: A 9×9-inch or similar-sized baking dish works perfectly for this recipe. It’s large enough to hold the layers of rice and salmon but small enough for a cozy serving size.
- Rice Cooker: If you make sushi rice frequently, a rice cooker can be a huge time-saver. It ensures that the rice is perfectly cooked every time.
- Microwave-Safe Cover: If you’re reheating the sushi bake in the microwave, use a microwave-safe cover to keep it from drying out.
FAQ Section
- Can I use frozen salmon? Yes, you can use frozen salmon as long as it’s properly thawed and cooked thoroughly before using it in the recipe.
- Can I make this ahead of time? Absolutely! You can assemble the sushi bake ahead of time and refrigerate it before baking. Just pop it in the oven when you’re ready to cook.
- Can I substitute the mayo? Yes, you can substitute with Greek yogurt for a lighter option or even use avocado for a creamy, dairy-free alternative.
- What if I don’t like sriracha? If sriracha isn’t your thing, feel free to skip it or add another type of sauce like wasabi mayo or even a sweet chili sauce.
Conclusion
I hope you’re as excited about this Salmon Sushi Bake as I am! It’s such a fun and flavorful twist on traditional sushi, and I promise it will become a new favorite in your recipe collection. With its creamy layers, crispy top, and sushi-inspired flavors, this dish is sure to impress. Plus, it’s so easy to make, and you can customize it to fit your personal taste. Whether you’re hosting a dinner party, feeding your family, or enjoying a lazy weekend meal, this recipe is a crowd-pleaser.