

Introduction
If there’s one recipe that always hits the spot, it’s Mongolian Beef. Imagine tender beef coated in a savory-sweet sauce, paired with crisp veggies and served over steaming rice. There’s something truly magical about that combination of flavors—sweet, salty, savory—with just a hint of spice. It’s comfort food at its finest, and it’s deceptively easy to make at home.
I first tried Mongolian Beef at a local Chinese restaurant, and it quickly became one of my all-time favorites. The moment that tender beef melted in my mouth, I knew I had to figure out how to recreate it at home. After a bit of trial and error, I’ve perfected this recipe, and I’m so excited to share it with you! It’s the kind of dish that’s perfect for a busy weeknight or a weekend dinner with friends. Plus, it’s quick—ready in under 30 minutes, which means you can skip the takeout and enjoy a homemade version that’s just as tasty, if not better.
So grab your wok (or a large skillet), and let’s dive into making this irresistible Mongolian Beef!
Why You’ll Love This Recipe
This Mongolian Beef recipe is everything you want in a dish:
- Quick and Easy: Ready in 20-30 minutes, making it perfect for busy weeknights.
- Family-Friendly: Sweet and savory flavors that even picky eaters will love.
- Rich in Flavor: The sauce is perfectly balanced with soy sauce, brown sugar, and garlic, with a touch of ginger for added depth.
- Customizable: You can adjust the heat by adding more or less red pepper flakes or even add some veggies like bell peppers or onions for extra texture and flavor.
Every bite is a burst of savory sweetness with the beef so tender it practically melts in your mouth. The sauce is thick and glossy, clinging to each piece of beef and infusing it with flavor. And the best part? It’s so much easier to make than you might think! Trust me, once you try it, this will become your go-to dinner for impressing guests or treating yourself to something delicious on a busy night.
Preparation Time and Servings
- Total Time: 25-30 minutes
- Servings: 4 servings
- Calories per Serving: 350 calories
- Protein: 25g
- Carbs: 35g
Ingredients
You don’t need any fancy ingredients to make this dish. Most of these items are pantry staples you probably already have!
- 1 lb flank steak (or sirloin steak, thinly sliced against the grain)
- 2 tablespoons cornstarch (to help coat the beef and give it that crispy texture)
- 3 tablespoons vegetable oil (for frying)
- 3 cloves garlic, minced (for that aromatic base)
- 1-inch piece of fresh ginger, grated (adds a zesty depth to the sauce)
- 1/2 cup soy sauce (use low-sodium for a healthier option)
- 1/4 cup brown sugar (for the perfect sweetness)
- 1/4 cup water
- 1/2 teaspoon red pepper flakes (adjust based on your spice preference)
- 2 green onions, sliced (for garnish and a fresh bite)
- Sesame seeds (optional, for a little crunch and a pop of flavor)
The flank steak is key to this recipe, as it’s tender and soaks up the sauce beautifully. The cornstarch gives the beef a crispy exterior while remaining juicy on the inside, and the combination of soy sauce and brown sugar creates that iconic balance of savory and sweet.
Step-by-Step Instructions
Now, let’s get cooking! The process is straightforward, and you’ll have a delicious meal in no time.
- Prep the Beef:
- Start by thinly slicing the flank steak against the grain. This helps to keep the meat tender and easy to chew.
- Place the beef slices in a bowl and sprinkle with 2 tablespoons of cornstarch. Toss the beef to coat it evenly. Don’t worry if it looks like a lot of cornstarch—the beef will absorb it and get a crispy exterior when cooked.
- Cook the Beef:
- Heat a large skillet or wok over medium-high heat and add 2 tablespoons of vegetable oil.
- Once the oil is hot (but not smoking), add the beef in batches to avoid overcrowding the pan. Fry the beef for 2-3 minutes per side until golden brown and crispy. Be patient—this step ensures that the beef has that delicious, crispy texture!
- Once cooked, remove the beef from the skillet and set it aside on a plate.
- Make the Sauce:
- In the same skillet, add the minced garlic and grated ginger. Stir-fry for about 30 seconds until fragrant.
- Add the soy sauce, brown sugar, and water to the skillet. Stir to combine. Bring the sauce to a simmer and let it cook for 3-4 minutes, until it thickens slightly.
- If you like a bit of heat, toss in the red pepper flakes at this point.
- Coat the Beef:
- Return the crispy beef to the skillet with the sauce. Toss everything together until the beef is well-coated with the sticky, glossy sauce. Let it simmer for an additional 2-3 minutes to ensure everything is heated through and the flavors meld together.
- Garnish and Serve:
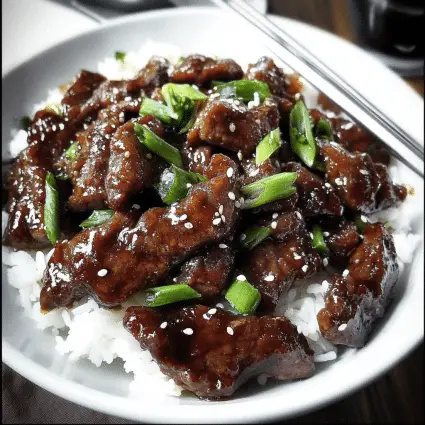
- Transfer the Mongolian Beef to a serving platter and sprinkle with sliced green onions and sesame seeds. Serve immediately over steamed rice or noodles for a complete meal.
How to Serve
Mongolian Beef is fantastic on its own, but here are a few ideas to make it even better:
- Serve over white or brown rice: The rice soaks up the flavorful sauce and provides a neutral base to balance out the rich beef.
- Top with steamed vegetables: Try adding some broccoli, bell peppers, or snap peas for extra crunch and color.
- Noodles: For a fun twist, serve the Mongolian Beef over egg noodles or soba noodles for a delicious noodle stir-fry vibe.
- Garnish with fresh herbs: Green onions and sesame seeds add a pop of flavor and texture.
Additional Tips
- Slice the Beef Thinly: The key to tender Mongolian Beef is slicing the flank steak thinly against the grain. This makes the beef more tender and allows it to absorb the sauce better.
- Don’t Skip the Cornstarch: The cornstarch helps create that crispy, golden texture on the beef. It also helps the sauce cling to the beef once it’s cooked.
- Adjust the Sweetness: You can tweak the sweetness of the sauce by adding more or less brown sugar. If you like your Mongolian Beef on the sweeter side, don’t hesitate to add an extra tablespoon.
- Add More Veggies: To balance the richness of the dish, consider adding vegetables like bell peppers, onions, or even baby bok choy to the stir-fry.
- Make Ahead: You can prep the beef and sauce ahead of time and store them separately in the fridge. When you’re ready to cook, just heat them up and follow the steps to finish the dish.
Recipe Variations
- Vegetarian Option: You can make a vegetarian version of this dish by substituting the beef with tofu or tempeh. Be sure to press the tofu well to remove excess moisture and help it crisp up.
- Gluten-Free: Use tamari or coconut aminos instead of soy sauce for a gluten-free version of the dish. Also, be sure to check that the cornstarch is certified gluten-free.
- Spicy Mongolian Beef: Add more heat by increasing the amount of red pepper flakes or even adding fresh chili peppers to the sauce.
- Add More Veggies: Want to make it more of a one-pan meal? Add in extra vegetables like bell peppers, zucchini, or snow peas to the sauce when you simmer it.
Serving Suggestions
To round out this meal, here are some side dishes and drinks that pair wonderfully with Mongolian Beef:
- Side Dishes:
- Steamed Jasmine rice: Its soft, fragrant texture is the perfect base for this savory dish.
- Stir-fried vegetables: A mix of broccoli, bell peppers, and carrots will balance out the richness of the beef.
- Crispy spring rolls: These will add a fun crunch to your meal and complement the Mongolian Beef perfectly.
- Wine Pairings: A chilled glass of Sauvignon Blanc or a lightly oaked Chardonnay would pair beautifully with the sweet and savory flavors of the Mongolian Beef.
- For kids: Serve the beef with buttered noodles or even over mashed potatoes for a kid-friendly twist.
Freezing and Storage
If you have leftovers (or want to make extra for meal prep), here’s how to store and freeze Mongolian Beef:
- Storing: Store the cooked Mongolian Beef in an airtight container in the fridge for up to 3 days. Reheat in a skillet over medium heat for the best texture.
- Freezing: To freeze, let the beef cool completely, then transfer it to a freezer-safe container. It will keep for up to 3 months. To reheat, thaw overnight in the fridge and then heat in a skillet over medium-low heat until warmed through.
Special Equipment
While this recipe doesn’t require anything fancy, there are a few tools that can help make the process smoother:
- Wok or Large Skillet: A wok is ideal for stir-frying, but a large skillet will work just fine for this recipe.
- Sharp Knife: A sharp knife will make slicing the beef thinly much easier.
- Tongs: Use tongs to handle the beef when frying, which helps keep it from breaking apart in the pan.
FAQ Section
Can I use a different cut of beef?
Yes! While flank steak is the traditional choice for Mongolian Beef, you can also use sirloin, rib-eye, or even skirt steak. Just be sure to slice it thinly against the grain.
Can I make Mongolian Beef ahead of time?
Yes, you can make the sauce ahead of time and store it in the fridge for up to 3 days. Just cook the beef fresh when you’re ready to serve.
What can I substitute for soy sauce?
You can use tamari (for gluten-free), coconut aminos, or even liquid aminos if you’re looking for a soy-free option.
How can I adjust the spice level?
To make it spicier, add more red pepper flakes or a few slices of fresh chili pepper. If you prefer it milder, simply reduce the amount of red pepper flakes or leave them out entirely.
Conclusion
Mongolian Beef is one of those recipes that’s sure to become a favorite in your kitchen. It’s easy to make, full of flavor, and always a hit with the family. Plus, it’s a great way to skip takeout and enjoy a homemade version that tastes just as good, if not better.
I can’t wait for you to try this recipe! Don’t forget to share your results on social media, tag me, or leave a comment below to let me know how it went. I’d love to hear what you think and see your delicious creations!