
Introduction
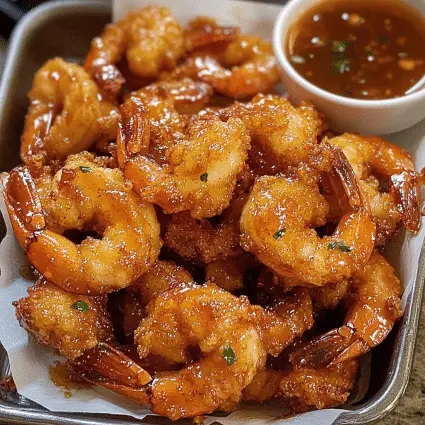
Have you ever bitten into something so perfectly crispy, sweet, and spicy that it makes you pause, savoring every second? That’s exactly what you’re getting with Hot Honey Fried Shrimp. This dish is a game-changer—plump, juicy shrimp coated in a light, golden crust and drizzled with a luscious hot honey glaze. It’s the ultimate combination of crunchy, tender, sweet, and fiery goodness. Whether you’re planning an appetizer for a party or a quick weeknight dinner, this recipe delivers on all fronts.
I first made these shrimp for a family barbecue, and let me tell you, they disappeared in minutes! My brother-in-law even asked if I had “secretly catered them.” Nope—just me, a skillet, and this foolproof recipe. Since then, these shrimp have become a must-have at every family gathering, and honestly, they’re so simple that I make them just for myself on lazy Sundays.
What makes this dish so special is the hot honey glaze. It’s warm, sticky, and perfectly balanced—spicy enough to make you sit up but not so overwhelming that it masks the shrimp’s delicate flavor. Paired with the satisfying crunch of fried shrimp, this dish is irresistible. Plus, the best part? You only need a handful of pantry staples and about 30 minutes from start to finish.
Ready to wow your taste buds (and your friends)? Let’s dive into how to make the ultimate Hot Honey Fried Shrimp.
Why You’ll Love This Recipe
Here are just a few reasons this recipe is guaranteed to become a favorite in your kitchen:
- Quick and easy: With a total prep and cook time of just 30 minutes, this is a stress-free recipe that’s perfect for any day of the week.
- Bursting with flavor: The combination of crispy shrimp and sweet-spicy honey glaze is pure magic. Each bite is an explosion of texture and taste.
- Versatile: Serve these shrimp as a fun appetizer, pair them with rice or a salad for a complete meal, or even stuff them into tacos for a unique twist.
- Crowd-pleaser: Whether you’re feeding picky kids, spice lovers, or seafood fans, everyone will be fighting over the last shrimp.
- Customizable heat level: Love things extra spicy? Add more chili flakes or a splash of hot sauce. Prefer mild heat? Tone it down by using less chili in the honey glaze.
This recipe is proof that you don’t need fancy ingredients or hours in the kitchen to create something unforgettable. Let’s get started!
Preparation Time and Servings
- Total Time: 30 minutes
- Prep Time: 15 minutes
- Cook Time: 15 minutes
- Servings: 4 (about 20–25 shrimp)
- Nutritional Facts (per serving):
Calories: 450
Protein: 25g
Carbs: 35g
Fat: 20g
Ingredients
For the Shrimp:
- 1 lb large shrimp, peeled and deveined
- 1 cup all-purpose flour
- 1/2 cup cornstarch (for extra crispiness)
- 1 tsp garlic powder
- 1 tsp smoked paprika
- 1/2 tsp cayenne pepper (optional)
- Salt and pepper, to taste
- 2 large eggs
- 2 tbsp milk
- Vegetable oil, for frying
For the Hot Honey Glaze:
- 1/3 cup honey
- 2 tbsp butter
- 1–2 tsp red chili flakes (adjust to your spice preference)
- 1 tsp apple cider vinegar
- A pinch of salt
Optional Garnishes:
- Fresh parsley, chopped
- Lemon wedges
Step-by-Step Instructions
Step 1: Prepare the Shrimp
- Rinse the peeled and deveined shrimp under cold water, then pat them dry with paper towels. This helps the coating stick better.
- Season the shrimp with a pinch of salt, pepper, and a sprinkle of paprika for added flavor.
Step 2: Set Up Your Breading Station
- In one bowl, combine the flour, cornstarch, garlic powder, smoked paprika, cayenne pepper (if using), and a pinch of salt. Mix well to ensure the spices are evenly distributed.
- In a second bowl, whisk the eggs and milk together until smooth.
Step 3: Bread the Shrimp
- Take each shrimp and coat it lightly in the flour mixture, shaking off any excess.
- Dip the shrimp into the egg mixture, making sure it’s fully coated.
- Return the shrimp to the flour mixture, pressing gently to ensure a thick, even coating. Set the breaded shrimp aside on a plate.
Step 4: Fry the Shrimp
- Heat about 1–2 inches of vegetable oil in a deep skillet or pot over medium-high heat. You’ll know the oil is ready when it reaches 350°F or when a small piece of bread sizzles and browns within 10 seconds.
- Fry the shrimp in batches, being careful not to overcrowd the pan. Cook each batch for 2–3 minutes per side or until golden brown and crispy.
- Use a slotted spoon to remove the shrimp and place them on a paper towel-lined plate to drain excess oil.
Step 5: Make the Hot Honey Glaze
- In a small saucepan over low heat, combine the honey, butter, chili flakes, apple cider vinegar, and a pinch of salt. Stir until the butter melts and everything is well combined.
- Let the glaze simmer for 1–2 minutes, then remove it from heat. Taste and adjust the spice level by adding more chili flakes if desired.
Step 6: Coat the Shrimp
- Transfer the fried shrimp to a large bowl. Drizzle the hot honey glaze over the top and toss gently to coat every piece evenly.

How to Serve
- Classic Appetizer: Serve the shrimp on a platter with toothpicks or a dipping sauce like spicy mayo.
- Main Dish: Pair with steamed jasmine rice or creamy mashed potatoes and a side of roasted vegetables for a hearty meal.
- Shrimp Tacos: Stuff the shrimp into warm tortillas with a slaw of shredded cabbage and a drizzle of extra hot honey.
- Salad Topper: Add the shrimp to a fresh green salad with avocado, cherry tomatoes, and a tangy vinaigrette.
Don’t forget to sprinkle fresh parsley over the top and serve with lemon wedges for a zesty finish!
Additional Tips
- Use Fresh Shrimp: Fresh shrimp give the best flavor and texture. If using frozen shrimp, thaw them completely and pat dry before cooking.
- Double-Dip for Extra Crunch: For even crispier shrimp, repeat the egg and flour coating process for a second layer before frying.
- Watch the Oil Temperature: Keep the oil between 350°F and 375°F to ensure the shrimp cook evenly without getting greasy.
- Make the Glaze Ahead: The hot honey glaze can be prepared in advance and reheated gently before serving. This is a great time-saver for parties.
- Keep Fried Shrimp Warm: If you’re making a large batch, keep the shrimp warm in a 200°F oven while frying the rest.
Recipe Variations
- Extra Spicy Shrimp: Add a splash of your favorite hot sauce to the glaze or sprinkle cayenne pepper directly onto the shrimp before frying.
- Gluten-Free: Use gluten-free flour and cornstarch for the breading. You won’t lose any of the crispiness!
- Air Fryer Option: Lightly spray breaded shrimp with oil and cook in an air fryer at 400°F for 8–10 minutes, flipping halfway through.
- Sticky Lemon Shrimp: Replace the hot honey glaze with a mix of lemon juice, honey, and a touch of soy sauce for a tangy twist.
- Vegetarian Alternative: Swap the shrimp for cauliflower florets and follow the same breading and frying process.
Freezing and Storage
- Storing Leftovers: Place leftover shrimp in an airtight container and refrigerate for up to 2 days. Reheat in a 375°F oven or air fryer for 5–7 minutes to regain crispiness.
- Freezing: Bread the shrimp, then freeze them uncooked on a baking sheet. Once frozen, transfer them to a freezer-safe bag for up to 2 months. Fry directly from frozen, adding an extra minute or two to the cooking time.
Special Equipment
- Deep Skillet or Dutch Oven: For even frying and consistent heat distribution.
- Slotted Spoon: Essential for removing shrimp from the oil without excess grease.
- Thermometer: A kitchen thermometer helps maintain the perfect frying temperature.
- Small Saucepan: Perfect for making the hot honey glaze.
FAQ
Can I make this recipe less spicy?
Yes, absolutely! If you’re not a fan of spice, you can easily reduce the heat level. Just cut down on the chili flakes in the honey glaze or even leave them out entirely for a sweet, buttery finish. If you still want a little kick, try adding a dash of black pepper or a mild hot sauce instead of chili flakes.
What’s the best way to store leftover shrimp?
Store any leftover shrimp in an airtight container in the fridge for up to 2 days. They’re best when fresh, but you can reheat them in a 375°F oven or air fryer for 5–7 minutes to bring back that crispy texture. If you don’t mind losing some crunch, you can also microwave them, though the texture won’t be quite the same.
Can I make the hot honey glaze ahead of time?
Yes! You can prepare the hot honey glaze a few days in advance. Simply store it in an airtight container in the fridge. When you’re ready to use it, just reheat it gently in a saucepan over low heat until it’s warm and smooth again. It’s a great time-saver if you’re prepping for a big meal or gathering!
Can I bake the shrimp instead of frying them?
Yes, you can bake the shrimp for a healthier alternative. Preheat your oven to 400°F and place the breaded shrimp on a parchment-lined baking sheet. Bake for about 15–20 minutes, flipping halfway through, until they’re golden and crispy. While the texture will be a little different from frying, they’ll still be delicious!
Can I use frozen shrimp for this recipe?
Definitely! You can use frozen shrimp, just make sure to thaw them completely before cooking. Place the shrimp in the fridge overnight to thaw, or run them under cold water for a quick thaw. After thawing, pat them dry with paper towels to remove excess moisture before breading and frying.
How do I make sure the shrimp stay crispy?
For the crispiest shrimp, make sure your oil is hot enough (around 350°F) before frying. Fry in small batches to avoid overcrowding, which can make the shrimp soggy. After frying, let the shrimp rest on a paper towel to absorb any excess oil. If you have leftovers, reheat them in the oven or air fryer to regain that crispy coating.
Conclusion
Hot Honey Fried Shrimp is everything you want in a dish—quick, flavorful, and so satisfying. With their crispy coating and sticky-sweet-spicy glaze, these shrimp are a guaranteed hit for any occasion. Whether you’re hosting a party, making dinner for the family, or treating yourself to something special, this recipe will never let you down.
Try it out, and don’t forget to share your creations!