

Introduction
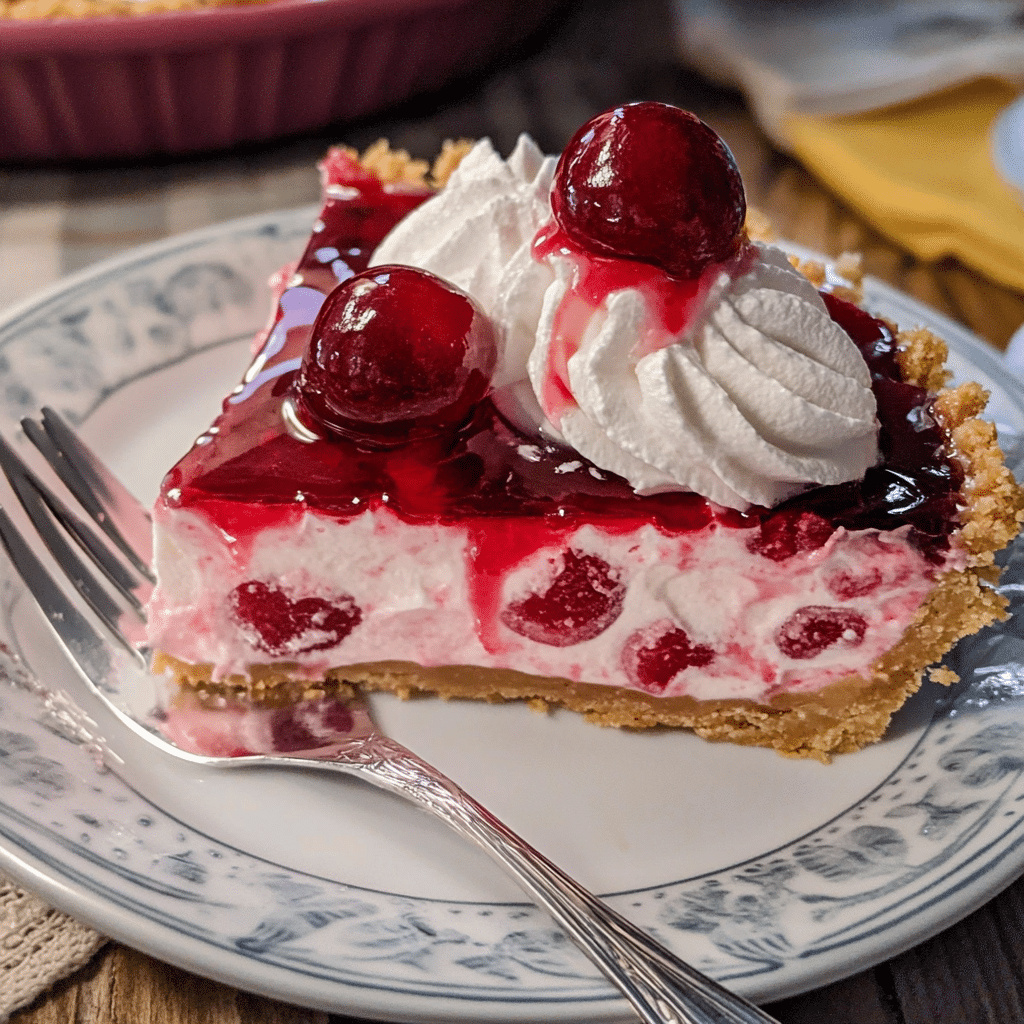
If you’re craving a sweet, tart, and refreshing dessert that requires minimal effort but delivers maximum flavor, Cherry Icebox Pie is the perfect treat. This dessert features a smooth and creamy filling made from cream cheese, sweetened condensed milk, and fresh lemon juice, all nestled in a crisp graham cracker crust. Topped with a luscious cherry topping, it’s a no-bake pie that’s simple to make and ideal for warm-weather gatherings, family dinners, or any time you need a cool and satisfying dessert.
In this article, we’ll dive into why Cherry Icebox Pie is such a beloved dessert, provide a step-by-step guide on how to make it, and offer variations to suit your personal preferences. This easy-to-prepare pie will be a hit with everyone, and the best part is that it can be made ahead of time and stored in the fridge, making it an excellent option for busy days.
Why You’ll Love This Recipe
- No-Bake and Simple: The beauty of Cherry Icebox Pie lies in how effortlessly it comes together. No oven required, and the whole process takes less than 20 minutes of active prep time.
- Tart and Sweet Flavor: The creamy filling combined with the tart cherry topping creates a perfect balance of sweet and tangy flavors that will leave you craving more.
- Versatile: This pie can be customized with your favorite fruits, nuts, or crust variations to suit any occasion or preference.
- Refreshing and Light: The chilled, refreshing nature of this dessert makes it perfect for hot summer days or after a heavy meal.
- Ideal for Special Occasions: Whether you’re hosting a holiday gathering, a summer barbecue, or a casual family dinner, this pie is sure to impress guests with its beautiful presentation and irresistible flavor.
Preparation Time and Servings
- Total Time: 6 hours and 20 minutes (20 minutes for prep, 6 hours for chilling)
- Servings: This recipe makes about 8 servings, depending on how large you slice the pieces.
- Nutrition Facts (per serving): Calories: 350, Protein: 3g, Carbs: 38g, Fat: 22g.
Ingredients
For the Crust:
- 1 ½ cups graham cracker crumbs: These create a sweet and crunchy base that complements the creamy filling.
- ¼ cup sugar: To sweeten the crust and add a touch of sweetness.
- 6 tablespoons unsalted butter: Melted butter helps bind the crust together and gives it a rich flavor.
For the Filling:
- 8 oz cream cheese: Softened, this is the base of the creamy filling.
- 1 (14 oz) can sweetened condensed milk: This provides the perfect balance of sweetness and creaminess.
- ¼ cup fresh lemon juice: The acidity of lemon juice adds a refreshing tang that balances the sweetness of the pie.
- 1 teaspoon vanilla extract: To enhance the flavor and aroma of the filling.
- 1 cup heavy whipping cream: Whipped to stiff peaks, this adds lightness and texture to the filling.
For the Cherry Topping:
- 1 can (21 oz) cherry pie filling: The classic topping for this pie, providing a bright and tart contrast to the creamy filling.
- 1 tablespoon lemon juice: Enhances the cherry flavor and adds a bit of tartness.
Optional Garnish:
- Whipped cream: For an extra indulgence, serve with a dollop of fresh whipped cream.
- Fresh mint leaves: For a pop of color and added freshness.
Step-by-Step Preparation
FIRST STEP: MAKE THE CRUST
- Prepare the Crust: In a medium bowl, combine the graham cracker crumbs, sugar, and melted butter. Stir the mixture until everything is well incorporated and the crumbs are evenly coated with the butter.
- Press the Crust Into the Pan: Transfer the mixture into a 9-inch pie pan or a tart pan, pressing the crumbs into the bottom and up the sides of the pan. Use the back of a spoon or the bottom of a glass to pack the crust firmly, ensuring an even layer.
- Chill the Crust: Place the crust in the refrigerator to chill while you prepare the filling. This helps the crust set and become firm.
SECOND STEP: MAKE THE FILLING
- Prepare the Cream Cheese: In a large mixing bowl, beat the softened cream cheese with an electric mixer until smooth and creamy. Scrape the sides of the bowl as needed to make sure everything is fully incorporated.
- Add the Sweetened Condensed Milk: Add the sweetened condensed milk to the cream cheese and continue to beat until well combined. The mixture should be smooth and free of lumps.
- Incorporate Lemon Juice and Vanilla Extract: Add the fresh lemon juice and vanilla extract, and mix until the filling is smooth and creamy. The lemon juice will add a refreshing tang to balance the sweetness.
- Whip the Cream: In a separate bowl, whip the heavy cream until stiff peaks form. You can use an electric mixer or a stand mixer for this step. Make sure the cream is fully whipped for a light and airy texture.
- Fold in the Whipped Cream: Gently fold the whipped cream into the cream cheese mixture using a spatula. Be careful not to deflate the whipped cream; you want the filling to remain light and fluffy.
THIRD STEP: ASSEMBLE THE PIE
- Fill the Crust: Pour the creamy filling into the chilled graham cracker crust. Use a spatula to smooth the top and ensure it is evenly distributed.
- Chill the Pie: Place the pie in the refrigerator and let it chill for at least 6 hours, or preferably overnight. This allows the filling to firm up and the flavors to meld together.
FOURTH STEP: MAKE THE CHERRY TOPPING
- Prepare the Cherry Topping: In a small bowl, mix the cherry pie filling with lemon juice. The lemon juice brightens the flavor of the cherries and enhances their natural sweetness.
- Top the Pie: Once the pie has set, spoon the cherry topping evenly over the chilled filling. You can spread it all the way to the edges or leave a border of the creamy filling exposed for a decorative effect.
- Garnish (Optional): For an extra touch, you can garnish the pie with whipped cream or fresh mint leaves for color and freshness.
FINAL STEP: SERVE AND ENJOY
- Slice the Pie: Using a sharp knife, slice the pie into 8 wedges. Serve each slice chilled for the best texture and flavor.
- Optional: Add Extra Whipped Cream: If you want to make the pie even more indulgent, serve it with a dollop of freshly whipped cream on top.
- Enjoy: Take a bite and savor the sweet, creamy, and tart flavors of this delightful Cherry Icebox Pie!
How to Serve Cherry Icebox Pie
Cherry Icebox Pie is an incredibly versatile dessert, perfect for many occasions. Here are some ways to serve it:
1. As a Summer Dessert
This pie is ideal for hot summer days, as it’s refreshing and light. Serve it as a sweet treat after a barbecue or outdoor picnic, and your guests will love the cool, creamy filling topped with juicy cherries.
2. For Holiday Gatherings
Whether it’s for Eid, Thanksgiving, or a family celebration, Cherry Icebox Pie is an excellent dessert for any special occasion. Its vibrant color and festive look will make it the star of the dessert table.
3. Pair with Tea or Coffee
Cherry Icebox Pie pairs wonderfully with a hot cup of tea or coffee. The refreshing cherry topping and creamy filling are a great balance to the bitterness of coffee or the subtle flavors of tea.
4. Serve with Fresh Fruits
To add a bit of freshness and contrast, serve slices of the pie with a side of fresh fruit like berries, citrus slices, or even thin slices of apple.
Recipe Variations
While Cherry Icebox Pie is delicious as written, there are several ways you can customize this recipe to suit your tastes:
1. Use Different Fruits
While cherries are the star of this pie, you can easily swap them for other fruits like strawberries, blueberries, or even a mix of tropical fruits like pineapple and mango. Just make sure to adjust the acidity with lemon juice to balance the sweetness.
2. Make a Nutty Crust
If you love a bit of crunch, consider adding chopped nuts like pecans, almonds, or walnuts to the graham cracker crust for extra texture and flavor.
3. Vegan or Dairy-Free Version
To make the pie vegan, you can substitute the cream cheese with dairy-free cream cheese, the heavy cream with coconut cream or a non-dairy whipping cream, and the sweetened condensed milk with a coconut-based or almond milk alternative.
Freezing and Storage
Cherry Icebox Pie can be made in advance and stored in the freezer or refrigerator for later use:
- In the Refrigerator: Store any leftover pie in an airtight container in the fridge for up to 3 days.
- In the Freezer: You can freeze the pie (without the cherry topping) for up to 1 month. Just make sure to cover it tightly in plastic wrap and foil. Let it thaw in the refrigerator overnight before serving. Add the cherry topping just before serving.
Special Equipment
You don’t need any special equipment for this recipe, but having a few essential kitchen tools will make the process easier:
- Mixing Bowls: For combining the crust and filling ingredients.
- Electric Mixer or Stand Mixer: For whipping the cream and blending the cream cheese filling.
- Pie Pan: A 9-inch pie pan works best for this recipe, but you can also use a tart pan or a springform pan if desired.
- Spatula: For spreading the filling evenly and folding in the whipped cream.
Frequently Asked Questions
- Can I use frozen cherries instead of canned cherry pie filling? Yes! You can use frozen cherries, but be sure to thaw and drain them first. You can then sweeten them with a little sugar or honey and cook them down to create your own topping.
- Can I make the crust gluten-free? Yes, you can substitute the graham crackers with gluten-free graham cracker crumbs or use gluten-free cookies for the crust.
- Can I make Cherry Icebox Pie ahead of time? Yes, this pie is great for making ahead. Prepare it the night before and let it chill overnight in the fridge.
- How long can I keep the pie in the fridge? The pie will keep well in the fridge for up to 3 days. Just make sure to cover it tightly with plastic wrap or foil.
Conclusion
Cherry Icebox Pie is a delightful and easy dessert that will quickly become a favorite in your recipe collection. With its sweet and creamy filling, crisp graham cracker crust, and tart cherry topping, this pie strikes the perfect balance of flavors and textures. Whether you’re serving it at a summer picnic, a holiday gathering, or simply as a treat after dinner, it’s sure to be a hit.
The best part is that you can make it ahead of time, leaving you with more time to relax and enjoy the company of friends and family. So why not give this refreshing dessert a try? We guarantee it will leave everyone asking for the recipe!