
Introduction
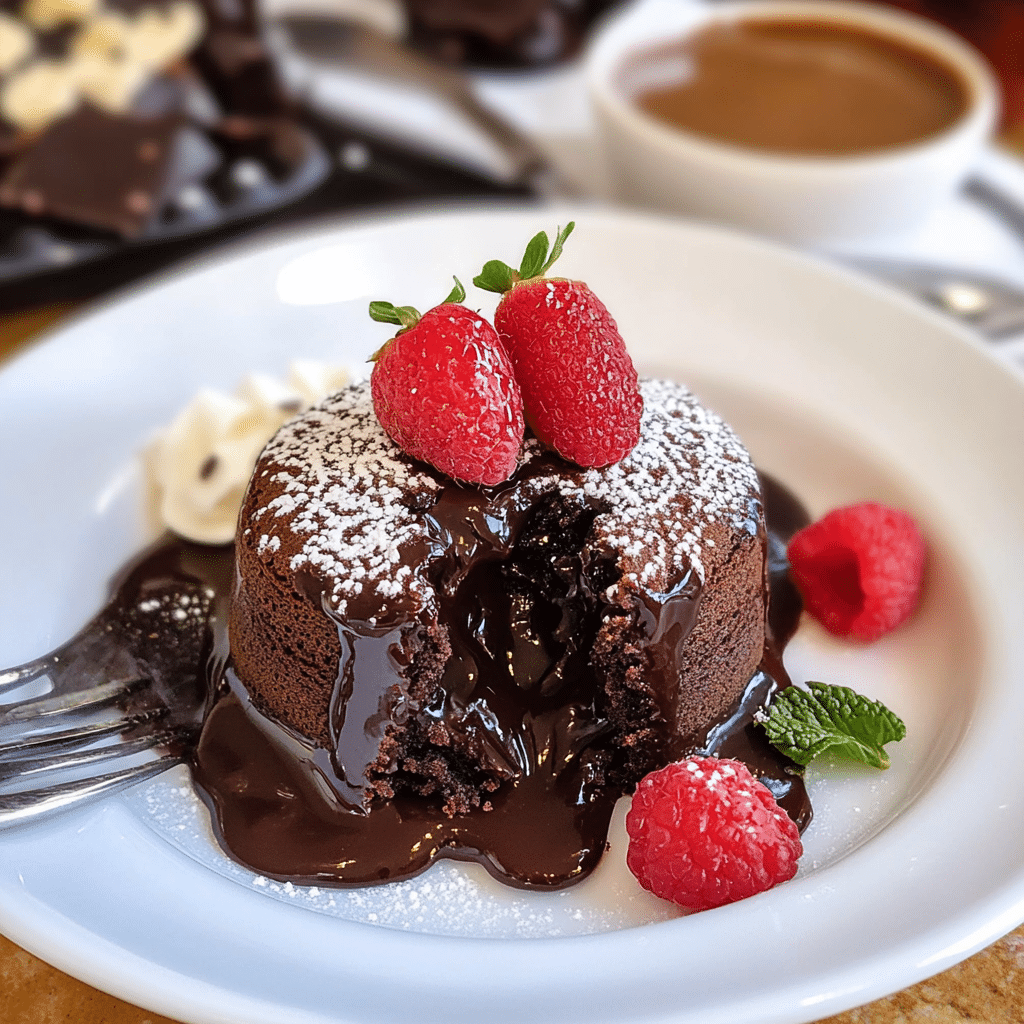
Chocolate Lava Cake is a decadent, indulgent dessert that has earned its reputation as the ultimate sweet treat. Known for its molten center that oozes out when you cut into it, this rich and gooey dessert is a favorite among chocolate lovers. With a crispy outer shell and a warm, velvety, and flowing center, it offers the perfect combination of textures. This recipe for Chocolate Lava Cake is a must-try for anyone who enjoys the irresistible allure of chocolate. Whether you’re celebrating a special occasion, impressing guests at a dinner party, or simply treating yourself to something special, this dessert will undoubtedly be a hit.
Perfect for:
- Romantic dinners or date nights
- Special celebrations like birthdays and anniversaries
- Dinner parties or gatherings with friends and family
- A sweet indulgence after a long day
- Chocolate enthusiasts
Why You’ll Love This Recipe for Chocolate Lava Cake
Here’s why Chocolate Lava Cake will become your go-to dessert:
- Molten Center: The gooey, molten chocolate center is the hallmark of this dessert, offering a rich and velvety surprise that makes each bite exciting.
- Rich Chocolate Flavor: Made with high-quality dark chocolate, the deep chocolate flavor is perfectly balanced with a hint of sweetness.
- Quick and Easy: Despite its gourmet appearance, this recipe is quick and easy to prepare. In just under 30 minutes, you can have these cakes baking away.
- Perfect for Sharing: Serve these individual portions to guests, and watch as they marvel at the molten center. It’s a dessert that’s sure to impress.
- Customizable: You can adjust the recipe to your liking by adding different flavorings or fillings, such as caramel, hazelnuts, or even a touch of orange zest.
Preparation and Cooking Time for Chocolate Lava Cake
- Total Time: 25 minutes
- Preparation Time: 10 minutes
- Baking Time: 15 minutes
- Servings: 4 cakes
- Calories per serving: Approximately 350-400 calories
- Key Nutrients: Protein: 6g, Carbs: 45g, Fat: 18g
Ingredients for Chocolate Lava Cake
Here’s what you’ll need to make this indulgent dessert:
- 4 oz (115g) dark chocolate (at least 70% cocoa)
- ½ cup (1 stick) unsalted butter
- 1 cup powdered sugar
- 2 large eggs
- 2 egg yolks
- ½ cup all-purpose flour
- 1 teaspoon vanilla extract
- A pinch of salt
- Butter and cocoa powder for greasing the ramekins
- Optional: A pinch of sea salt for topping
Ingredient Highlights for Chocolate Lava Cake
- Dark Chocolate: The dark chocolate provides the rich, deep chocolate flavor that is essential for the molten center. Using high-quality chocolate will ensure the best results.
- Butter: The butter creates the tender, delicate crumb on the outside, while also helping to form the silky texture of the molten center.
- Eggs and Egg Yolks: The eggs give the lava cake its structure and help create a smooth, rich filling. The extra egg yolks make the filling creamy and velvety.
- Vanilla Extract: A splash of vanilla enhances the overall flavor profile, balancing the richness of the chocolate.
Step-by-Step Instructions for Chocolate Lava Cake
Follow these simple steps to create the perfect Chocolate Lava Cake:
Prepare the Lava Cake Batter:
- Preheat the Oven: Preheat your oven to 425°F (220°C). Prepare four 6-ounce ramekins by greasing them with butter and dusting them with cocoa powder. This will help the cakes release easily after baking.
- Melt the Chocolate and Butter: In a heatproof bowl, combine the dark chocolate and butter. Melt them together either in the microwave (in 20-second intervals, stirring each time) or over a double boiler, stirring constantly until smooth. Set aside to cool slightly.
- Whisk the Eggs and Sugar: In a separate large bowl, whisk the eggs, egg yolks, and powdered sugar together until the mixture becomes smooth and slightly thickened. This should take about 2-3 minutes of whisking.
- Combine the Wet Ingredients: Once the melted chocolate and butter mixture has cooled slightly, stir in the vanilla extract. Then, pour this mixture into the egg and sugar mixture. Stir gently until fully combined.
- Add the Flour: Sift the flour and salt into the bowl and fold it into the batter using a spatula. Be careful not to overmix, as this can affect the texture of the lava cakes.
Bake the Lava Cakes:
- Fill the Ramekins: Evenly divide the batter among the prepared ramekins, filling each one about ¾ full. If you like, you can add a small piece of chocolate in the center of each ramekin to make the molten center even richer.
- Bake: Place the ramekins on a baking sheet and bake for 12-14 minutes. The cakes should be firm around the edges but soft in the center. The key to a perfect lava cake is to ensure the outer edges set while leaving the center molten.
- Cool Slightly: Once the cakes are done, remove them from the oven and allow them to cool for 1-2 minutes. This will help the cakes set slightly before serving.
Serve the Chocolate Lava Cakes:
- Invert and Serve: Carefully run a knife around the edges of each ramekin to loosen the cake. Place a plate over the top of each ramekin and gently flip it over. Tap the ramekin lightly to release the lava cake.
- Garnish and Enjoy: Optionally, top with a dusting of powdered sugar, a dollop of whipped cream, or a scoop of vanilla ice cream. You can also sprinkle a pinch of sea salt on top for an added flavor boost.

How to Serve Chocolate Lava Cake
Chocolate Lava Cake is a dessert that can be enjoyed in a variety of ways:
- With Ice Cream: A scoop of vanilla or raspberry ice cream is the perfect pairing for the warm, gooey cake. The cold ice cream contrasts beautifully with the molten center.
- With Whipped Cream: Top the lava cake with a dollop of freshly whipped cream for a rich and creamy finish.
- With Fresh Berries: A handful of fresh berries, like raspberries or strawberries, adds a fruity tartness that balances the sweetness of the cake.
- For Dinner Parties: Serve the lava cakes on elegant dessert plates, alongside a glass of cold milk or a rich cup of coffee.
- For a Romantic Dessert: Share the cakes with your loved one, savoring each bite of the gooey chocolate center together.
Additional Tips for Chocolate Lava Cake
Here are some tips to make your Chocolate Lava Cake even better:
- Don’t Overbake: The key to a successful lava cake is ensuring that the center remains molten. If you bake it too long, the center will set completely, and you’ll miss that signature gooey texture.
- Use Room Temperature Ingredients: Make sure your eggs and butter are at room temperature before starting. This helps the ingredients blend together smoothly.
- Chill the Batter: If you prepare the batter ahead of time, you can chill it for up to 24 hours before baking. This can make it easier to handle and ensures a perfectly molten center.
- Test for Doneness: If you’re unsure whether your cakes are done, you can gently press the top of the cake with a spoon. It should feel firm on the edges but soft in the middle.
- Use High-Quality Chocolate: Since chocolate is the star of this dessert, using high-quality chocolate will make a noticeable difference in flavor.
Recipe Variations of Chocolate Lava Cake
Here are 10 variations of Chocolate Lava Cake that you can try:
- Nutella Lava Cake: Add a spoonful of Nutella to the center of the lava cake before baking for a creamy, hazelnut-filled center.
- Peanut Butter Lava Cake: Add a tablespoon of creamy peanut butter to the center for a savory-sweet twist.
- Caramel Lava Cake: Add a small spoonful of caramel sauce in the center to create a rich, caramel-filled molten center.
- Raspberry Lava Cake: Add fresh raspberries or raspberry jam in the center for a fruity contrast to the chocolate.
- Orange Chocolate Lava Cake: Add a teaspoon of orange zest to the batter or a little bit of orange liqueur to the filling for a citrusy twist.
- Coffee Lava Cake: Add a teaspoon of instant espresso powder to the batter for a mocha-flavored lava cake.
- Mint Chocolate Lava Cake: Add a few fresh mint leaves or a teaspoon of mint extract for a refreshing twist on this classic dessert.
- Coconut Lava Cake: Mix in some shredded coconut into the batter for a tropical flavor that complements the chocolate.
- White Chocolate Lava Cake: Use white chocolate instead of dark chocolate for a lighter version of this dessert.
- Vegan Lava Cake: Swap the eggs and butter for plant-based alternatives like flax eggs and coconut oil, and use dairy-free chocolate.
Freezing and Storage for Chocolate Lava Cake
- Freezing: If you want to make these lava cakes in advance, you can freeze the unbaked cakes. Simply prepare them up to the point of filling the ramekins and freeze them. When you’re ready to bake, just add an extra 2-3 minutes to the baking time.
- Storage: Chocolate Lava Cakes are best enjoyed fresh. However, you can store any leftover cakes in an airtight container in the fridge for up to 2 days. To reheat, place the cakes in the oven at 350°F (175°C) for 5-7 minutes.
Special Equipment for Chocolate Lava Cake
Here are some special equipment items you might need to make Chocolate Lava Cake:
- Ramekins: Small, oven-safe ramekins are essential for baking the individual portions of lava cake.
- Electric Mixer: While you can whisk the eggs and sugar by hand, an electric mixer can make the process faster and more consistent.
- Heatproof Bowl: A heatproof bowl is needed for melting the chocolate and butter together.
- Sifter: A sifter helps you add flour to the batter without clumps, ensuring a smooth texture.
- Baking Sheet: A baking sheet makes it easy to transfer the ramekins into the oven and ensures even heat distribution.
FAQ Section about Chocolate Lava Cake
- Can I use milk chocolate instead of dark chocolate? Yes, but the flavor of the lava cake will be sweeter and less intense. Dark chocolate provides a rich, deep flavor that complements the molten center.
- Can I make this dessert dairy-free? Yes, you can use dairy-free butter and dairy-free chocolate to make the lava cake dairy-free.
- Can I prepare the lava cakes ahead of time? Yes, you can prepare the batter in advance and refrigerate it. Just remember to bake the cakes shortly before serving to maintain the molten center.
- How do I prevent the cakes from sticking to the ramekins? Be sure to grease the ramekins thoroughly with butter and dust them with cocoa powder. This will help the cakes release easily after baking.
- Can I make a single larger cake instead of individual portions? While lava cakes are typically made in individual ramekins, you can make a larger version in a bundt pan or similar dish. Adjust the baking time accordingly.
Chocolate Lava Cake
- Prep Time: 20minutes
- Total Time: 4hours
Ingredients
- Peanut Butter: The star of the show! Use smooth, creamy peanut butter to create a smooth and indulgent filling. Ensure the peanut butter is halal-certified.
- Graham Crackers: The graham cracker crust adds a perfect balance of sweetness and crunch, complementing the creamy peanut butter filling.
- Cream Cheese: Softened cream cheese helps create a rich, smooth texture for the filling while enhancing the flavor.
- Whipped Topping and Heavy Cream: These ingredients provide lightness and creaminess to the pie filling, making it fluffy and rich.
- Semi-Sweet Chocolate Chips: Used for the chocolate drizzle, these chips add an extra layer of sweetness and richness that perfectly complements the peanut butter.
Instructions
Prepare the Crust for Reese’s Peanut Butter Pie:
- Prepare the Crust: Begin by crushing the graham crackers into fine crumbs. You can use a food processor or place them in a zip-lock bag and crush them with a rolling pin.
- Mix the Crust Ingredients: In a medium-sized bowl, combine the graham cracker crumbs, granulated sugar, and melted butter. Mix until the crumbs are evenly coated.
- Form the Crust: Press the graham cracker mixture into the bottom of a 9-inch pie dish, ensuring the crust is evenly distributed along the base and up the sides.
- Chill the Crust: Place the crust in the refrigerator to chill while you prepare the filling. This will help it set and hold its shape when the pie is sliced.
Make the Peanut Butter Filling for Reese’s Peanut Butter Pie:
- Beat the Cream Cheese and Peanut Butter: In a large mixing bowl, beat together the softened cream cheese and peanut butter using a hand mixer or stand mixer on medium speed. Beat until smooth and well combined.
- Add the Powdered Sugar and Vanilla Extract: Gradually add the powdered sugar and vanilla extract to the peanut butter mixture, continuing to beat until fully incorporated.
- Add the Whipped Topping: Fold in the whipped topping gently to keep the filling light and fluffy.
- Whip the Heavy Cream: In a separate bowl, whip the heavy cream until stiff peaks form. Carefully fold the whipped cream into the peanut butter mixture, ensuring everything is evenly combined.
- Fill the Pie Crust: Once the crust has chilled, pour the peanut butter filling into the graham cracker crust. Smooth the top with a spatula to ensure an even layer.
Chill the Pie for Reese’s Peanut Butter Pie:
- Chill the Pie: Refrigerate the pie for at least 3 hours or until fully set. The longer it chills, the firmer the filling will become, making it easier to slice.
Add the Topping for Reese’s Peanut Butter Pie:
- Prepare the Chocolate Drizzle: Melt the semi-sweet chocolate chips in a heatproof bowl over a pot of simmering water or in the microwave in 30-second intervals. Stir until the chocolate is completely melted and smooth.
- Drizzle the Chocolate: Once the pie has set, drizzle the melted chocolate over the top of the pie in a decorative pattern.
- Add the Chopped Reese’s Cups: Sprinkle the chopped Reese’s Peanut Butter Cups over the top of the pie for added texture and flavor.
- Optional Sea Salt: For a sweet and salty contrast, sprinkle a pinch of sea salt over the pie.
Serve and Enjoy Reese’s Peanut Butter Pie:
- Slice and Serve: Once the pie is chilled and topped, slice it into 8-10 servings. Serve chilled, and enjoy the creamy, decadent peanut butter and chocolate goodness!
Nutrition
- Serving Size: 10
- Calories: 450
- Fat: 27g
- Carbohydrates: 45g
- Protein: 8g
Conclusion of Chocolate Lava Cake
Chocolate Lava Cake is the ultimate dessert for any occasion. Its rich and velvety molten center combined with a delicate, crisp exterior is sure to satisfy any chocolate craving. Whether you’re baking for a special celebration, a romantic dinner, or simply treating yourself, this recipe is a guaranteed crowd-pleaser. With its simple yet indulgent ingredients and easy-to-follow steps, Chocolate Lava Cake will quickly become your go-to dessert for impressing guests or enjoying a little sweet indulgence. Enjoy!